今回購入したプリンター
本日 MF642Cdw を購入したので色々遊んでみます。
ドライバーのインストール
以下のページよりドライバーをダウンロードします。
LIPSLX/ CARPS2 Printer Driver for Linux Ver.5.30 (32bit & 64bit)
あとはインストールです。
$ ls -l
total 182048
-rw-r--r-- 1 ubuntu ubuntu 186409724 Mar  7 07:16 linux-lipslx-drv-v530-jp-07.tar.gz

$ tar xvfz linux-lipslx-drv-v530-jp-07.tar.gz
$ sudo su
$ apt install cups

...

E: Unmet dependencies. Try 'apt --fix-broken install' with no packages (or specify a solution).

$ apt --fix-broken install
$ snap install avahi
$ cd linux-lipslx-drv-v530-jp
$ ./install.sh
#----------------------------------------------------#
# Install Printer Driver (dpkg -i -G --force-overwrite)
#----------------------------------------------------#
(Reading database ... 95011 files and directories currently installed.)
Preparing to unpack .../cnrdrvcups-lipslx_5.30-1_amd64.deb ...
Unpacking cnrdrvcups-lipslx (5.30-1) over (5.30-1) ...
Setting up cnrdrvcups-lipslx (5.30-1) ...
Processing triggers for mime-support (3.60ubuntu1) ...
(Reading database ... 95011 files and directories currently installed.)
Preparing to unpack .../cnrcupsiradvc357zj_5.20-1_all.deb ...
Unpacking cnrcupsiradvc357zj (5.20-1) over (5.20-1) ...
Preparing to unpack .../cnrcupsiprc170zj_5.20-1_all.deb ...
Unpacking cnrcupsiprc170zj (5.20-1) over (5.20-1) ...
Setting up cnrcupsiradvc357zj (5.20-1) ...
Setting up cnrcupsiprc170zj (5.20-1) ...

#----------------------------------------------------#
# cups restart
#----------------------------------------------------#
/etc/init.d/cups restart
[ ok ] Restarting cups (via systemctl): cups.service.

Installation is complete.

$ sudo cp /etc/cups/cups-browsed.conf /etc/cups/cups-browsed.conf.bu
$ sudo emacs /etc/cups/cups-browsed.conf
$ sudo diff /etc/cups/cups-browsed.conf /etc/cups/cups-browsed.conf.bu
474c474
< CreateIPPPrinterQueues All
---
> # CreateIPPPrinterQueues All

$ sudo systemctl restart cups-browsed
プリンタの設定
先のドライバーのインストールでこのままプリンタの設定をするか、的なことを聞かれるので、それに従い行います。
localhost:631 にブラウザでアクセスし、Printers から追加されたプリンタを選択し、プリンタ名をメモしておきます。
$ lpoptions -d Canon-MF642C-644C-CARPS2
copies=1 device-uri=lpd://10.0.0.86 finishings=3 job-cancel-after=10800 job-hold-until=no-hold job-priority=50 job-sheets=none,none marker-change-time=1615108867 marker-colors=none marker-levels=-1 marker-names marker-types=unknown number-up=1 printer-commands=none printer-info=Canon-MF642C-644C-CARPS2 printer-is-accepting-jobs=true printer-is-shared=true printer-is-temporary=false printer-location printer-make-and-model='Canon MF642C/644C CARPS2' printer-state=3 printer-state-change-time=1615108868 printer-state-reasons=none printer-type=5340 printer-uri-supported=ipp://localhost/printers/Canon-MF642C-644C-CARPS2
実際に印刷:
$ echo "Printed finally!" | lprこれで正常に印刷されたら OK です。
FTP サーバーの設定
マニュアルを見ると、スキャンしたデータを FTP サーバーに送ることができるみたいなので、やっておきます。
まずはユーザーとディレクトリの作成から。
$ sudo useradd printer
$ sudo passwd printer
$ sudo mkdir /home/printer
$ sudo chown -R printer:printer /home/printer
$ sudo mkdir /scanned
$ sudo chown -R printer:printer /scanned
$ sudo chmod -R 777 /scanned
あとは vsftpd のインストール及び設定のみです。
$ sudo apt install vsftpd
$ sudo cp /etc/vsftpd.conf /etc/vsftpd.conf.bu
$ sudo diff /etc/vsftpd.conf /etc/vsftpd.conf.bu
31c31
< write_enable=YES
---
> #write_enable=YES
35c35
< local_umask=022
---
> #local_umask=022
99,100c99,100
< ascii_upload_enable=YES
< ascii_download_enable=YES
---
> #ascii_upload_enable=YES
> #ascii_download_enable=YES
114c114
< chroot_local_user=YES
---
> #chroot_local_user=YES
123c123
< chroot_list_enable=YES
---
> #chroot_list_enable=YES
125c125
< chroot_list_file=/etc/vsftpd.chroot_list
---
> #chroot_list_file=/etc/vsftpd.chroot_list
131c131
< ls_recurse_enable=YES
---
> #ls_recurse_enable=YES
156,157d155
< local_root=/scanned
< seccomp_sandbox=NO
\ No newline at end of file

$ cat /etc/vsftpd.chroot_list
printer

$ sudo systemctl restart vsftpd
$ sudo systemctl status vsftpd
● vsftpd.service - vsftpd FTP server
   Loaded: loaded (/lib/systemd/system/vsftpd.service; enabled; vendor preset: enabled)
   Active: active (running) since Sun 2021-03-07 10:33:54 UTC; 5s ago
  Process: 10461 ExecStartPre=/bin/mkdir -p /var/run/vsftpd/empty (code=exited, status=0/SUCCESS)
 Main PID: 10466 (vsftpd)
    Tasks: 1 (limit: 2312)
   CGroup: /system.slice/vsftpd.service
           └─10466 /usr/sbin/vsftpd /etc/vsftpd.conf

Mar 07 10:33:54 ubuntu18printer systemd[1]: Starting vsftpd FTP server...
Mar 07 10:33:54 ubuntu18printer systemd[1]: Started vsftpd FTP server.

$ sudo netstat -antp | grep vsftpd
tcp6       0      0 :::21                   :::*                    LISTEN      10466/vsftpd
適当に他の端末からログインできるか確認します。
$ ftp 192.168.100.13
Connected to 192.168.100.13.
220 (vsFTPd 3.0.3)
Name (192.168.100.13:yuki): printer
331 Please specify the password.
Password:
230 Login successful.
Remote system type is UNIX.
Using binary mode to transfer files.
ftp>
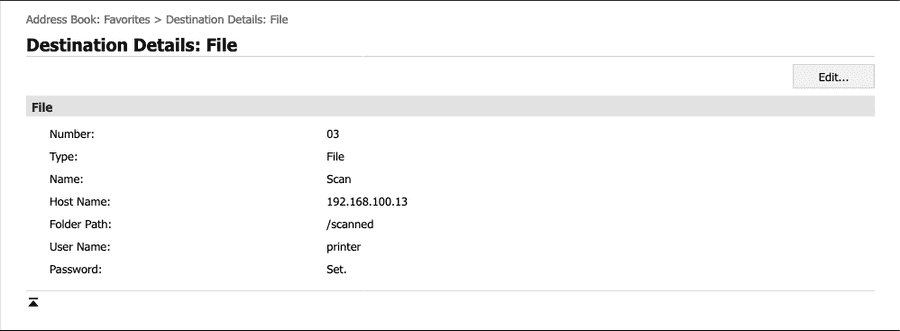
あとはプリンター側の設定 UI から Address Book を選択、以下のように設定を行えば OK です。
スキャンされたファイルが保存されていることがわかりますね。
$ ls -l /scanned/
total 16
-rw-rw-rw- 1 printer printer 13431 Mar  7 13:25 0005_210307052534_001.pdf