Transit Gateway とは
先日の AWS re:Invent 2018 にて発表された新サービスで、異なる VPC 間であったり VPN - VPC 間の通信のハブとなるような役割を持つゲートウェイとなります。
例えば今まで一つの拠点から複数の VPC に対して VPN を張るときは、それぞれの VPC に対して VGW をアタッチし、VPN 接続を作成する必要がありました。しかし、Transit Gateway では各 VPC 及びオンプレミス拠点は Transit Gateway のみに接続する構成をとることができます。
また今まで VPC - VPC 間の接続は VPC Peering を使用するのが一般的でしたが、3 つ以上の VPC を相互に接続させるためには、それぞれの VPC 間で Peering を作成し、メッシュ化させる必要がありました。しかし、これからはそれぞれの VPC を Transit Gateway に接続させておけばその問題も解決します。
今回は YAMAHA RTX 1200 を用いて、Transit Gateway により Oregon Region の VPC 2 つと VPN 接続を張ってみたいと思います。
実際に使ってみる
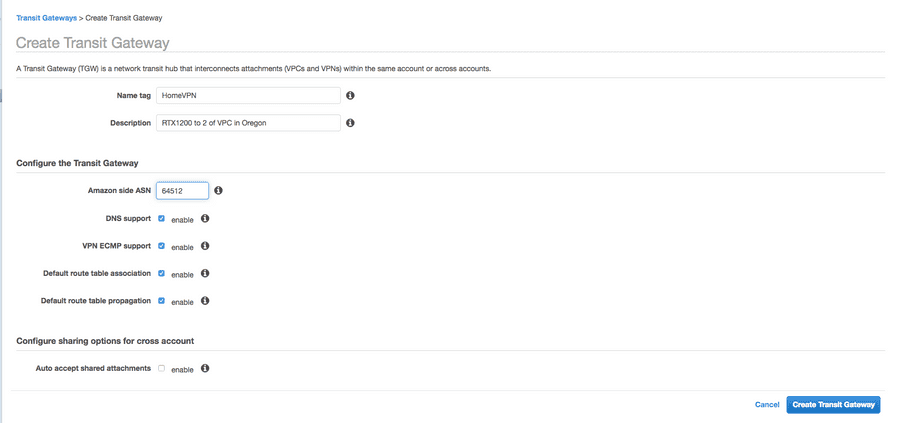
まずは、マネジメントコンソールより Transit Gateway を作成します。
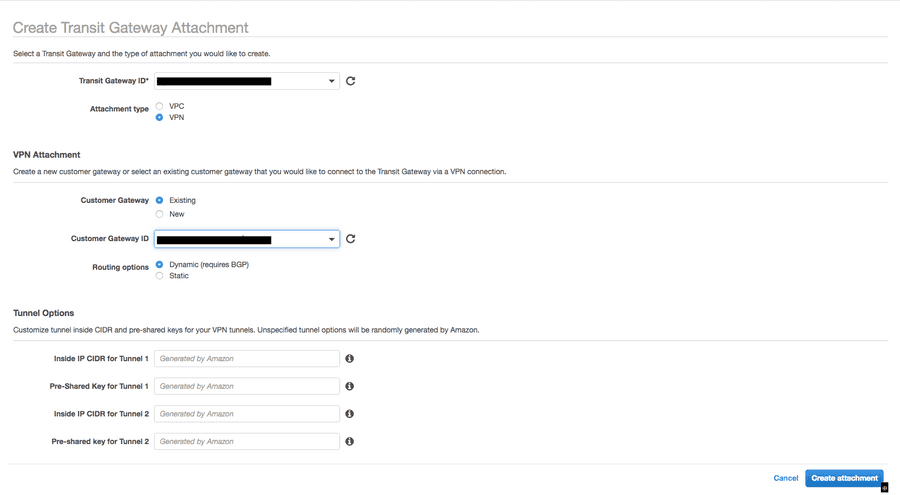
作成した Transit Gateway の状態が pending から available になったら、左ペインの Transit Gateway Attachments から実際に VPN 接続をアタッチしていきます。
今回は既に存在する Customer Gateway を使用し、Routing Option は Dynamic としておきます。
で、Create attachment で作成していきます。
ここで、VPN Connections を見てみると、Transit Gateway に関連づけられた VPN 接続が新たにできていることがわかります。
あとは使用しているカスタマーゲートウェイの種類に応じて設定ファイルをダウンロードし、カスタマーゲートウェイ側の設定を行うだけです。
# show ipsec sa
Total: isakmp:2 send:2 recv:2

sa   sgw isakmp connection   dir  life[s] remote-id
-----------------------------------------------------------------------------
1     1    -    isakmp       -    28637   52.11.177.207
2     1    1    tun[001]esp  send 3439    52.11.177.207
3     1    1    tun[001]esp  recv 3439    nn52.11.177.207
4     2    -    isakmp       -    28641   52.42.181.89
5     2    4    tun[002]esp  send 3443    52.42.181.89
6     2    4    tun[002]esp  recv 3443    52.42.181.89
上記のようにカスタマーゲートウェイ側からも AWS 側からもトンネルが UP であることを確認します。
この時点で、Transit Gateway Route Tables を確認すると、カスタマーゲートウェイ側から広告されたルートが反映されているのを確認できます。
さて、次にいよいよ Transit Gateway に VPC をアタッチしてみましょう。
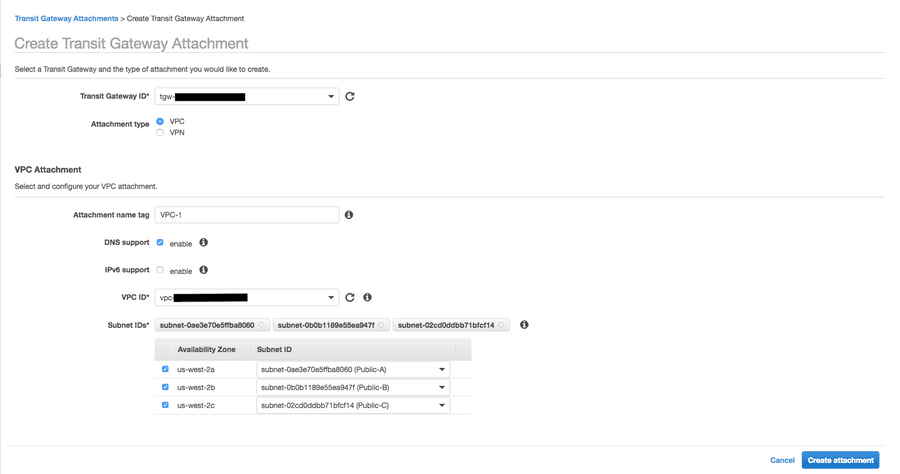
再度 Transit Gateway Attachments から Create Transit Gateway Attachment で VPC をアタッチします。
ここで、以下のドキュメントにも記載の通り、1 AZ につき 1 つのサブネットしか関連づけられない点に注意しましょう。(AZ 毎に 1 つサブネットを指定すれば同一 AZ の全てのサブネット内のリソースにトラフィックは到達できるので心配不要です)
(Transit Gateway Attachments to a VPC #Create a Transit Gateway Attachment to a VPC)
https://docs.aws.amazon.com/vpc/latest/tgw/tgw-vpc-attachments.html#create-vpc-attachment
(以下抜粋)
For Subnet IDs, select one subnet for each Availability Zone to be used by the transit gateway to route traffic. You must select at least one subnet. You can select only one subnet per Availability Zone.
これが終わると以下のように Transit Gateway Route Tables に VPC のルートも反映されていることがわかります。
また、カスタマーゲートウェイ側からも VPC のプレフィクスが Transit Gateway から広告され、ルートテーブルに反映されていることが確認できます。
# show ip route detail
Destination         Gateway          Interface       Kind  Additional Info.
default             10.0.0.1               LAN2    static
10.0.0.0/24         10.0.0.237             LAN2  implicit
10.3.0.0/16         169.254.12.13     TUNNEL[1]       BGP  path=64512 origin=EG
P metric=100
10.3.0.0/16         169.254.15.1      TUNNEL[2]       BGP  (hidden) path=64512
origin=EGP metric=100
10.4.0.0/16         169.254.12.13     TUNNEL[1]       BGP  path=64512 origin=EG
P metric=100
10.4.0.0/16         169.254.15.1      TUNNEL[2]       BGP  (hidden) path=64512
origin=EGP metric=100
169.254.12.12/30    -                 TUNNEL[1]  implicit
169.254.15.0/30     -                 TUNNEL[2]  implicit
192.168.100.0/24    192.168.100.1          LAN1  implicit
最後に、それぞれの VPC のルートテーブルに VPN 及びもう一つの VPC に対するルートを追加します。
もちろん、今後のスケールを考えて 10.0.0.0/8 を Destination にすることも可能です。これにより VPC が増えた時にそれらを Transit Gateway にアタッチし、10.0.0.0/8 をルートテーブルに追加するだけで通信できるようになります。
今回は 2 つなので、とりあえずそれぞれ追加してみました。
これで全ての準備は完了です。
接続性テスト
それでは実際に VPC 1 (10.3.0.0/16) 、VPC 2 (10.4.0.0/16) 及びオンプレ拠点 (192.168.100.0/24) 間で通信が行えるか試してみましょう。
VPC 1 から VPC 2 及びオンプレ拠点に対して
[ec2-user@ip-10-3-2-143 ~]$ ping 10.4.3.23
PING 10.4.3.23 (10.4.3.23) 56(84) bytes of data.
64 bytes from 10.4.3.23: icmp_seq=1 ttl=254 time=0.914 ms
64 bytes from 10.4.3.23: icmp_seq=2 ttl=254 time=0.701 ms
64 bytes from 10.4.3.23: icmp_seq=3 ttl=254 time=0.792 ms
64 bytes from 10.4.3.23: icmp_seq=4 ttl=254 time=0.800 ms
^C
--- 10.4.3.23 ping statistics ---
4 packets transmitted, 4 received, 0% packet loss, time 3071ms
rtt min/avg/max/mdev = 0.701/0.801/0.914/0.083 ms [ec2-user@ip-10-3-2-143 ~]$ ping 192.168.100.9
PING 192.168.100.9 (192.168.100.9) 56(84) bytes of data.
64 bytes from 192.168.100.9: icmp_seq=1 ttl=62 time=22.2 ms
64 bytes from 192.168.100.9: icmp_seq=2 ttl=62 time=17.6 ms
64 bytes from 192.168.100.9: icmp_seq=3 ttl=62 time=16.0 ms
64 bytes from 192.168.100.9: icmp_seq=4 ttl=62 time=16.6 ms
^C
--- 192.168.100.9 ping statistics ---
4 packets transmitted, 4 received, 0% packet loss, time 3004ms
rtt min/avg/max/mdev = 16.021/18.131/22.217/2.433 ms VPC 2 から VPC 1 及びオンプレ拠点に対して
[ec2-user@ip-10-4-3-23 ~]$ ping 10.3.2.143
PING 10.3.2.143 (10.3.2.143) 56(84) bytes of data.
64 bytes from 10.3.2.143: icmp_seq=1 ttl=254 time=0.879 ms
64 bytes from 10.3.2.143: icmp_seq=2 ttl=254 time=0.784 ms
64 bytes from 10.3.2.143: icmp_seq=3 ttl=254 time=0.712 ms
64 bytes from 10.3.2.143: icmp_seq=4 ttl=254 time=0.789 ms
^C
--- 10.3.2.143 ping statistics ---
4 packets transmitted, 4 received, 0% packet loss, time 3061ms
rtt min/avg/max/mdev = 0.712/0.791/0.879/0.059 ms [ec2-user@ip-10-4-3-23 ~]$ ping 192.168.100.9
PING 192.168.100.9 (192.168.100.9) 56(84) bytes of data.
64 bytes from 192.168.100.9: icmp_seq=1 ttl=62 time=21.0 ms
64 bytes from 192.168.100.9: icmp_seq=2 ttl=62 time=16.9 ms
64 bytes from 192.168.100.9: icmp_seq=3 ttl=62 time=15.4 ms
64 bytes from 192.168.100.9: icmp_seq=4 ttl=62 time=16.4 ms
^C
--- 192.168.100.9 ping statistics ---
4 packets transmitted, 4 received, 0% packet loss, time 3004ms
rtt min/avg/max/mdev = 15.436/17.460/21.020/2.127 ms オンプレ拠点から VPC 1 及び VPC 2 に対して
[Ubuntu-Xen@192.168.100.9]:~ $ ping 10.3.2.143
PING 10.3.2.143 (10.3.2.143) 56(84) bytes of data.
64 bytes from 10.3.2.143: icmp_seq=1 ttl=252 time=16.0 ms
64 bytes from 10.3.2.143: icmp_seq=2 ttl=252 time=17.2 ms
64 bytes from 10.3.2.143: icmp_seq=3 ttl=252 time=18.8 ms
64 bytes from 10.3.2.143: icmp_seq=4 ttl=252 time=17.3 ms
^C
--- 10.3.2.143 ping statistics ---
4 packets transmitted, 4 received, 0% packet loss, time 3004ms
rtt min/avg/max/mdev = 16.011/17.350/18.873/1.029 ms [Ubuntu-Xen@192.168.100.9]:~ $ ping 10.4.3.23
PING 10.4.3.23 (10.4.3.23) 56(84) bytes of data.
64 bytes from 10.4.3.23: icmp_seq=1 ttl=252 time=18.4 ms
64 bytes from 10.4.3.23: icmp_seq=2 ttl=252 time=18.6 ms
64 bytes from 10.4.3.23: icmp_seq=3 ttl=252 time=17.4 ms
64 bytes from 10.4.3.23: icmp_seq=4 ttl=252 time=16.2 ms
^C
--- 10.4.3.23 ping statistics ---
4 packets transmitted, 4 received, 0% packet loss, time 3005ms
rtt min/avg/max/mdev = 16.276/17.704/18.683/0.960 ms どれも大丈夫そうですね。


