背景
日々 Serverless アプリを開発するにあたって、React の SPA を S3 + CloudFront にホストしつつ、バックエンドリソースは CDK で開発することが多くなってきました。ただ、これらをどうにか上手いことまとめて CI/CD できないか、という課題を抱えていました。バックエンドは CDK で開発しているため、一応 GitHub 等の SCM を使ってコードの保管はしていたものの結局デプロイ時はローカルで cdk deploy していたし、これを CodePipeline + CodeBuild で自動化することも考えましたが、ビルドプロジェクト内で cdk deploy するのはなんか違うなぁ (そもそもそれビルドステージだし…) という感情や、cdk synth で出力した内容を用いて、Deployment Provider として CloudFormation を使うというのも面倒でなかなか手を出せずにいました。そもそもパイプライン自体をアプリケーションとは別 (CloudFormation やコンソール等) で作らなきゃいけないのももやもやでした。また、フロントのパイプラインは別になっていましたが、これも一人で個人趣味レベルの開発をする身としては管理が微妙に面倒で、どうせならフロントとバックエンドのビルド + デプロイを一気に一つのパイプラインでやって欲しい、あとリポジトリはアプリケーション 1 つに対して 1 個しか持ちたくない、という思いもありました。
なお、以前は SAM を使ってパイプライン、フロントのホスティング環境、バックエンドリソース、アプリケーションコードのビルド/デプロイをまとめて行っていた時期もありましたが、結局 JSON を書きたくなくて、CDK を使うようになってからはほとんど SAM を用いることは無くなりました。また Amplify CLI ですが、こいつは絶妙に痒いところに手が届かず、最終的には CloudFormation テンプレートを弄ることになるという経験を幾度となくしたので、こちらも使わなくなりました。
そんなこんなで色々弄ってるうちに、以前 CDK Pipeline を試したらこれが結構良さそうだったので、CDK Pipeline を用いて React 製 Serverless SPA に含まれるコンポーネント全てを一気に CI/CD する方法について模索し、アプリケーションテンプレートを作ってみました。
前提
まず、具体的に自動デプロイするリソースは以下の通りです。バックエンドのリソースについてはアプリケーションに依存する部分が大きいので、とりあえず API Gateway / Lambda / DynamoDB あたりを挙げておきます。
| コンポーネント | リソース |
|---|---|
| フロントエンドのホスティング環境 | S3, CloudFront, Route53 (Alias レコード) |
| バックエンドリソース | API Gateway, Lambda, DynamoDB 等 |
| CI/CD 用パイプライン | CodePipeline, CodeBuild 等 (これは CDK Pipeline で自動で作られる) |
| React 製 SPA | N/A (CodeBuild のビルドプロジェクトでビルド、S3 にコピーする予定) |
なお、先に述べたように今回は全てのコードを単一リポジトリで管理することとしますので、そもそもチーム開発向きのソリューションではないかもしれません。また、CloudFront Distribution で利用するドメイン名や ACM 証明書は予め用意しておくものとします。
ディレクトリ構造
プロジェクトのディレクトリ構造はざっくり以下の通りです。
- frontend/: create-react-app で作成した React アプリのプロジェクトルート
-
bin/: CDK bin ディレクトリ
- app.py: CDK アプリケーションのエントリポイント
-
lib/: CDK スタック及び Lambda 関数定義用ディレクトリ
- backend_stack.py: バックエンドリソースを定義する部分。ここに Lambda や API Gateway 等を追加していく
- backend_pipeline_stage.py: パイプラインでバックエンドリソースをデプロイするためのステージ
- frontend_stack.py: フロントアプリのホスティング環境 (CloudFront, S3, Route53) を定義する部分
- frontend_pipeline_stage.py: フロントのホスティング環境をデプロイするためのステージ
- pipeline_stack.py: 全てのコンポーネントを一気にビルド/デプロイするためのパイプラインを定義するスタック
- configure.py: CDK アプリケーション用設定スクリプトを書いてみた で作った CDK アプリ用設定スクリプト
- config.params.json: configure.py で利用される設定ファイル
設定ファイル
CDK アプリケーション用設定スクリプトを書いてみた で作った CDK アプリ用設定スクリプトを使うため、config.params.json を以下の内容で作成しておきます。
{
  "Namespace": "/ReactCDKAppTemplate/",
  "Parameters": [
    {
      "Name": "CloudFrontAliasCertArn",
      "CLIFormat": "cloudfront-alias-cert-arn",
      "Description": "The ARN for the ACM certificate used for CloudFront destribution"
    },
    {
      "Name": "CloudFrontDomainName",
      "CLIFormat": "cloudfront-domain-name",
      "Description": "The domain name for CloudFront destribution"
    },
    {
      "Name": "HostedZoneName",
      "CLIFormat": "hosted-zone-name",
      "Description": "The name of Route 53 Hosted Zone"
    },
    {
      "Name": "HostedZoneId",
      "CLIFormat": "hosted-zone-id",
      "Description": "The ID of Route 53 Hosted Zone"
    }
  ],
  "DefaultOptions": [
    {
      "CLIFormat": "delete",
      "ShortCLIFormat": "d",
      "Action": "store_true",
      "Help": "delete all AWS SSM Parameters (after CDK stack was destroyed)"
    },
    {
      "CLIFormat": "interactive",
      "ShortCLIFormat": "i",
      "Action": "store_true",
      "Help": "run in interactive mode"
    },
    {
      "CLIFormat": "test",
      "ShortCLIFormat": "t",
      "Action": "store_true",
      "Help": "run in test mode (only creates config.cache.json, but does not store parameters to SSM Parameter Store)"
    }
  ]
}
フロントエンドホスティング環境
まずは S3 + CloudFront の環境を作るところです。これは lib/frontend_stack.py でやることにします。ただ、SSM Parameter Store に保管されたドメイン名や ACM 証明書、Route53 Hosted Zone を引っ張ってくる必要があるので、ssm.StringParameter.value_for_string_parameter() を用います。また、namespace については親ディレクトリにある config.params.json から引っ張ってくるようにしました。
具体的にはこんな感じです。
import json

import aws_cdk as cdk
from constructs import Construct
from aws_cdk import (
  Stack,
  CfnOutput,
  aws_ssm as ssm,
  aws_s3 as s3,
  aws_certificatemanager as acm,
  aws_cloudfront as cloudfront,
  aws_route53 as route53,
  aws_route53_targets as targets,
)

config_params = json.load(open("config.params.json", "r"))
namespace = config_params["Namespace"]


class FrontendStack(Stack):

  @property
  def s3_bucket_name(self):
    return self._s3_bucket_name

  @property
  def app_url(self):
    return self._app_url

  def __init__(self, scope: Construct, construct_id: str, **kwargs) -> None:
    super().__init__(scope, construct_id, **kwargs)

    cloudfront_alias_cert_arn = ssm.StringParameter.value_for_string_parameter(self, namespace + "CloudFrontAliasCertArn")
    cloudfront_domain_name = ssm.StringParameter.value_for_string_parameter(self, namespace + "CloudFrontDomainName")
    hosted_zone_id = ssm.StringParameter.value_for_string_parameter(self, namespace + "HostedZoneId")
    hosted_zone_name = ssm.StringParameter.value_for_string_parameter(self, namespace + "HostedZoneName")

    bucket = s3.Bucket(self, "ReactWebAppHostingBucket", )
    bucket.apply_removal_policy(cdk.RemovalPolicy.DESTROY)

    certificate = acm.Certificate.from_certificate_arn(self, "Certificate", certificate_arn=cloudfront_alias_cert_arn)

    cloudfront_oai = cloudfront.OriginAccessIdentity(self, "MyCfnCloudFrontOriginAccessIdentity")
    cloudfront_distribution = cloudfront.CloudFrontWebDistribution(self, "ReactWebbAppDistribution",
      comment="CloudFront Distribution for {}".format(namespace.replace("/", "")),
      default_root_object="index.html",
      viewer_certificate=cloudfront.ViewerCertificate.from_acm_certificate(certificate,
        aliases=[cloudfront_domain_name],
      ),
      origin_configs=[
        cloudfront.SourceConfiguration(
          s3_origin_source=cloudfront.S3OriginConfig(
            s3_bucket_source=bucket,
            origin_access_identity=cloudfront_oai
          ),
          behaviors=[cloudfront.Behavior(is_default_behavior=True)]
        )
      ],
      error_configurations=[
        cloudfront.CfnDistribution.CustomErrorResponseProperty(
          error_code=404,
          error_caching_min_ttl=0,
          response_code=200,
          response_page_path="/index.html"
        )
      ]
    )
    bucket.grant_read(cloudfront_oai.grant_principal)

    zone = route53.HostedZone.from_hosted_zone_attributes(self, "ZoneForApp",
      hosted_zone_id=hosted_zone_id,
      zone_name=hosted_zone_name
    )

    record = route53.ARecord(self, "AliasRecord",
      zone=zone,
      target=route53.RecordTarget.from_alias(targets.CloudFrontTarget(cloudfront_distribution))
    )

    self._s3_bucket_name = CfnOutput(
      self, "S3BucketName",
      value=bucket.bucket_name
    )

    self._app_url = CfnOutput(
      self, "WebAppUrl",
      value="https://" + record.domain_name,
      description="The URL of the app"
)あとはこれをデプロイするステージを作ってあげれば良いので、lib/frontend_pipeline_stage.py を以下のように作成します。
from constructs import Construct
from aws_cdk import (
  Stage
)
from frontend_stack import FrontendStack

class FrontendPipelineStage(Stage):

  @property
  def s3_bucket_name(self):
    return self._s3_bucket_name

  @property
  def app_url(self):
    return self._app_url

  def __init__(self, scope: Construct, id: str, **kwargs):
    super().__init__(scope, id, **kwargs)

    frontend = FrontendStack(self, "Frontend")
    self._app_url = frontend.app_url
self._s3_bucket_name = frontend.s3_bucket_nameなお、s3_bucket_name については、React アプリをコピーする際に使うので property として持っておきます。
バックエンドリソース
フロントから叩く API 等、バックエンドのリソースについては lib/backend_stack.py に記述します。とりあえず適当な API を一つだけ追加するために、lambda ディレクトリを作成し、その中に hello.py を置いておきます。
def handler(event, context):
  return {
    'statusCode': 200,
    'headers': {
      'Content-Type': 'text/plain'
    },
    'body': 'Hello'
  }
lib/backend_stack.py は以下のような内容になり、ここに新たに作成するリソースを随時追加していく、みたいな使い方になると思います。(リソースが増えすぎたら小分けにしても良いかと思います)
from constructs import Construct
from aws_cdk import (
  Stack,
  CfnOutput,
  aws_lambda as _lambda,
  aws_apigateway as apigw,
)

class BackendStack(Stack):

  @property
  def hello_api_endpoint(self):
    return self._hello_api_endpoint

  def __init__(self, scope: Construct, construct_id: str, **kwargs) -> None:
    super().__init__(scope, construct_id, **kwargs)

    hello_lambda = _lambda.Function(
      self, 'HelloHandler',
      runtime=_lambda.Runtime.PYTHON_3_9,
      code=_lambda.Code.from_asset('lib/lambda'),
      handler='hello.handler',
    )

    hello_api = apigw.LambdaRestApi(
      self, 'Endpoint',
      handler=hello_lambda
    )

    self._hello_api_endpoint = CfnOutput(
      self, 'HelloAPIEndpoint',
      value=hello_api.url
)あとはフロントホスティング環境と同様に、lib/backend_pipeline_stage.py でデプロイ用ステージを作成してあげます。
from constructs import Construct
from aws_cdk import (
  Stage
)
from backend_stack import BackendStack

class BackendPipelineStage(Stage):

  @property
  def hello_api_endpoint(self):
    return self._hello_api_endpoint

  def __init__(self, scope: Construct, id: str, **kwargs):
    super().__init__(scope, id, **kwargs)

    backend = BackendStack(self, "Backend")
self._hello_api_endpoint = backend.hello_api_endpointなお、.env に API のエンドポイントを追加する関係上、API エンドポイントについては property として持ち、外部から参照できるようにしておきます。
React アプリ
frontend/ 配下に React アプリを置いておきます。create-react-app するだけです。
$ npx create-react-app frontendCDK パイプライン
ここまでできたらいよいよパイプラインを作ります。BackendPipelineStage 及び FrontendPipelineStage をインポートしてパイプラインに追加、また FrontendPipelineStage には React アプリをビルドし、S3 バケットにアップロードするアクションを追加します。なお、この際に CodeBuild ビルドプロジェクトには S3 に対するアクセス権限が必要になりますが、これは aws_cdk.pipelines.ShellStep では実現できないため、ここ に書いているように aws_cdk.pipelines.CodeBuildStep を使います。
lib/pipeline_stack.py は以下の内容になります。なお、ここでリポジトリ及びブランチも指定するようにしました。
from aws_cdk import (
  Stack,
  SecretValue,
  pipelines as pipelines,
  aws_iam as iam,
)
from constructs import Construct
from backend_pipeline_stage import BackendPipelineStage
from frontend_pipeline_stage import FrontendPipelineStage

class PipelineStack(Stack):

  def __init__(self, scope: Construct, construct_id: str, **kwargs) -> None:
    super().__init__(scope, construct_id, **kwargs)

    repository = "U-PIN/react-cdk-template"
    branch = "main"

    pipeline = pipelines.CodePipeline(
      self,
      "Pipeline",
      synth=pipelines.ShellStep(
        "Synth",
        input=pipelines.CodePipelineSource.git_hub(
          repository,
          branch,
          authentication=SecretValue.secrets_manager("GitHubOAuthToken")
        ),
        commands = [
          "npm install -g aws-cdk",
          "pip install -r requirements.txt",
          "npx cdk synth"
        ]
      )
    )

    backend = BackendPipelineStage(self, "DeployBackend")
    backend_stage = pipeline.add_stage(backend)

    frontend = FrontendPipelineStage(self, "DeployFrontend")
    frontend_stage = pipeline.add_stage(frontend)
    frontend_stage.add_post(
      pipelines.CodeBuildStep(
        "BuildAndDeployWebAppToS3",
        env_from_cfn_outputs={
          "S3_BUCKET": frontend.s3_bucket_name,
          "HELLO_API": backend.hello_api_endpoint
        },
        commands=[
          "cd frontend",
          'echo REACT_APP_HELLO_API="$HELLO_API" >> .env',
          "npm install",
          "npm run build",
          "aws s3 sync build s3://$S3_BUCKET/"
        ],
        role_policy_statements=[
          iam.PolicyStatement(
            actions=["s3:*"],
            resources=["*"]
          )
        ]
      )
    )
デプロイしてみる
それでは実際にデプロイしてみます。まずは venv の作成・有効化です。
$ python3 -m venv .venv
$ source .venv/bin/activate
次に依存関係のインストールを行います。
$ pip install -r requirements.txt
$ cd frontend
$ cd npm install
その後、SSM Parameter Store に必要なパラメータを保存します。
$ python configure.py -i実際にこれをテンプレートとして利用し、新たにアプリケーションを作成する場合は新規でリポジトリを作成し、lib/pipeline_stack.py を編集する必要がありますが、とりあえずそこは飛ばして、cdk deploy してみます。
$ npx cdk synth
$ npx cdk deploy
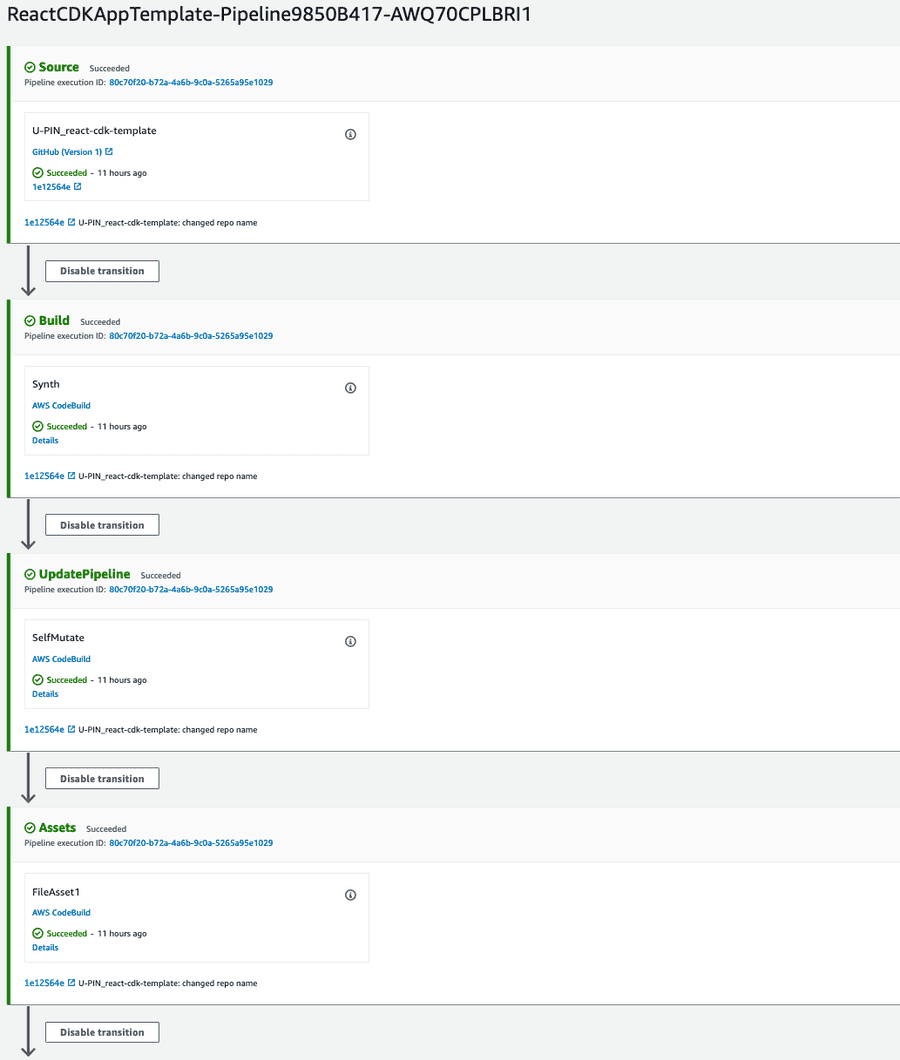
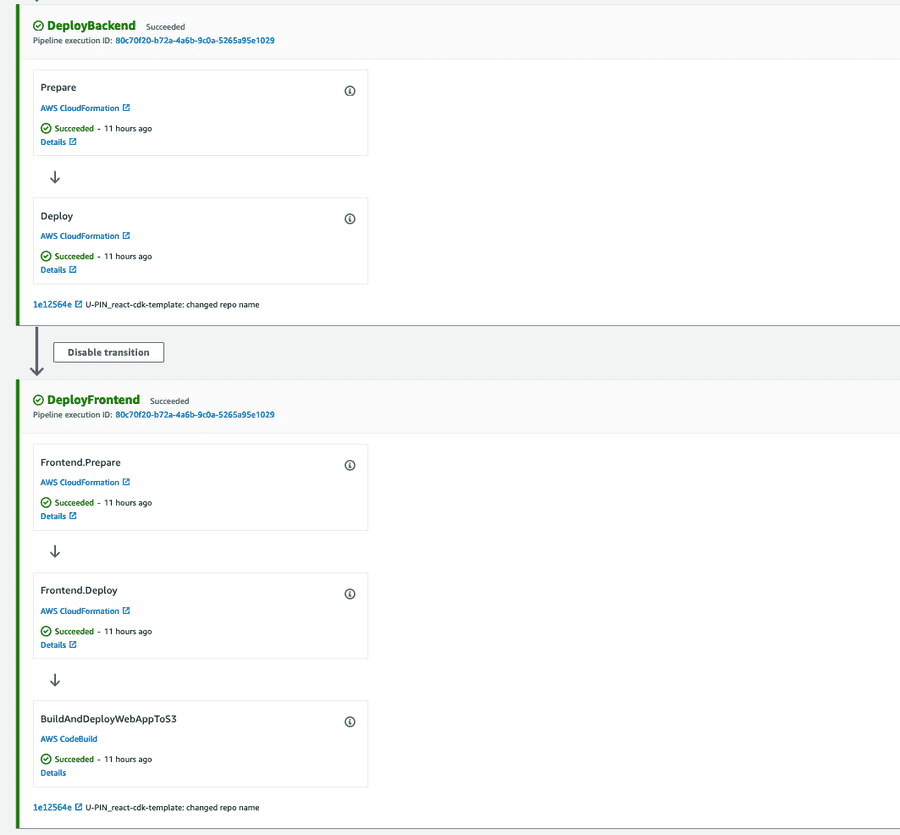
これで以下のようにパイプラインが作成、実行開始され、全てのリソースがデプロイされたら完了です。
おわりに
いかがでしたでしょうか。これで今後は Serverless SPA の作成にさらに拍車がかかりそうです。次は最近 GA になった Lambda / API Gateway のローカルテストを試してみたいと思います。
なお、今回作成したテンプレートについては こちら に置いておきます。

